Peas are a cool-season crop that rewards careful timing more than complicated techniques. If you want to grow garden peas, such as snow peas and sugar snap peas well, focus on cool soil, steady moisture, good drainage, and support before the vines begin to sprawl. This guide walks through choosing varieties, planting seeds, best planting peas, caring for vines, solving common problems, such as: “how do peas grow, how to grow peas from seed, types of peas, etc.” , and harvesting garden peas at the right stage for fresh eating, freezing, drying, or seed saving.
When should you plant peas?
Plant peas when the soil is cool but workable, usually in early spring for a main crop and, in some climates, late summer for a fall crop. Pea seeds can tolerate cool conditions, but they germinate poorly in cold, waterlogged soil; many gardeners wait until soil is roughly 50°F or warmer for more reliable sprouting. Growth is usually best in cool weather, and hot conditions can slow flowering, reduce pod set, or bring the season to an early close.
The right planting window varies by region. In mild-winter areas, peas may be sown in fall or winter. In colder climates, they are often planted as soon as beds can be prepared in spring. If your spring warms quickly, choose faster-maturing bush or dwarf varieties and sow as early as conditions allow.
👉regional vegetable planting calendar
Spring planting
Spring is the classic season for growing peas because the crop thrives before summer heat settles in. Direct sow seeds outdoors once the soil is no longer frozen or saturated. If the bed sticks to your tools in heavy clumps, wait a few days; peas dislike sitting in wet soil before they sprout.
A simple way to judge readiness is to squeeze a handful of soil. If it holds shape but crumbles when pressed, it is close to workable. If it forms a slick, dense ball, the bed is too wet and compaction is likely.
Fall planting
A fall crop can work where late summer and early autumn bring several weeks of cool growing weather. The challenge is that pea seeds may struggle in hot soil, and young plants may be exposed to heat stress before cooler days arrive. To improve germination, sow in a lightly shaded bed, water consistently, and consider using a shade cloth until seedlings are established.
Fall sowing needs enough time for plants to flower and form pods before hard freezes. Because recommendations vary by climate and variety, use the “days to maturity” on the seed packet as a guide, then add a little extra time for shorter autumn days.
The best pea types for your garden
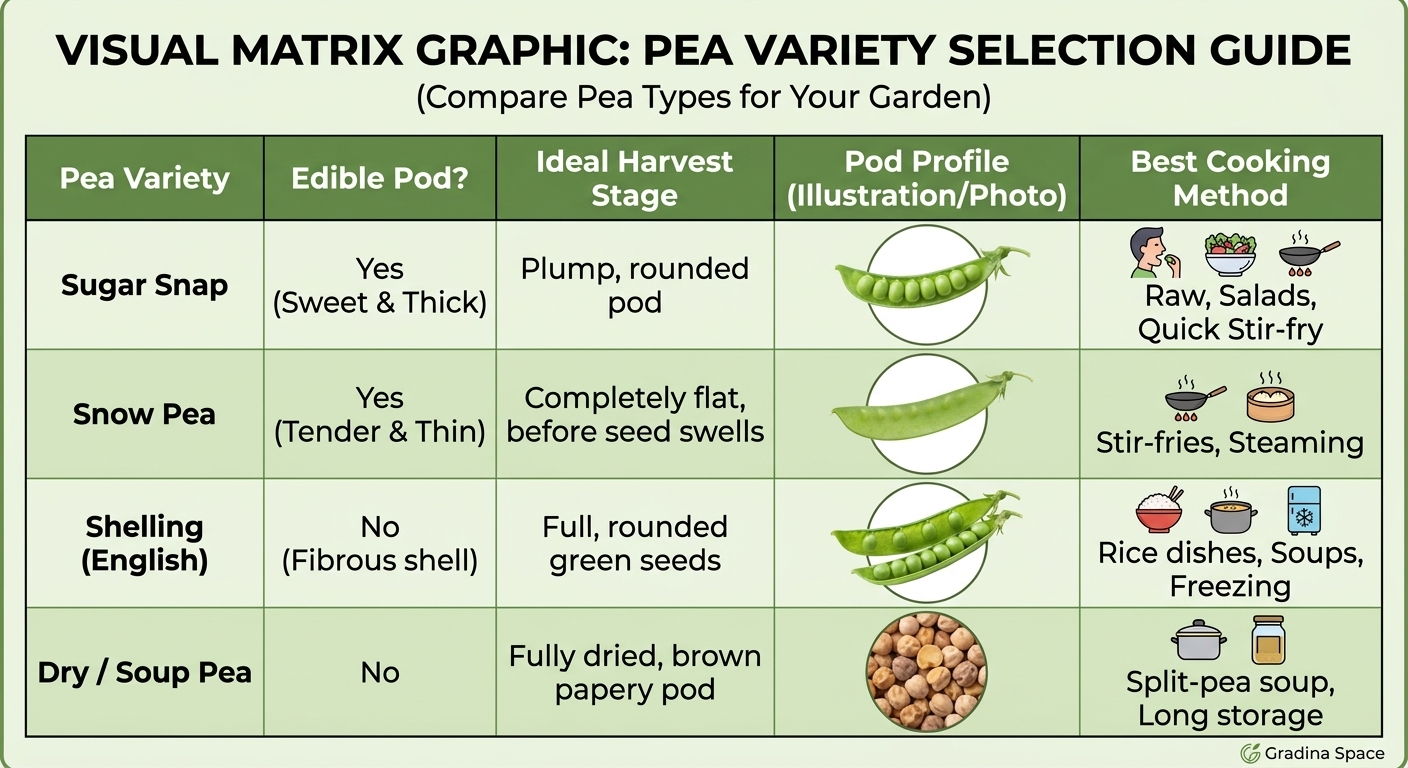
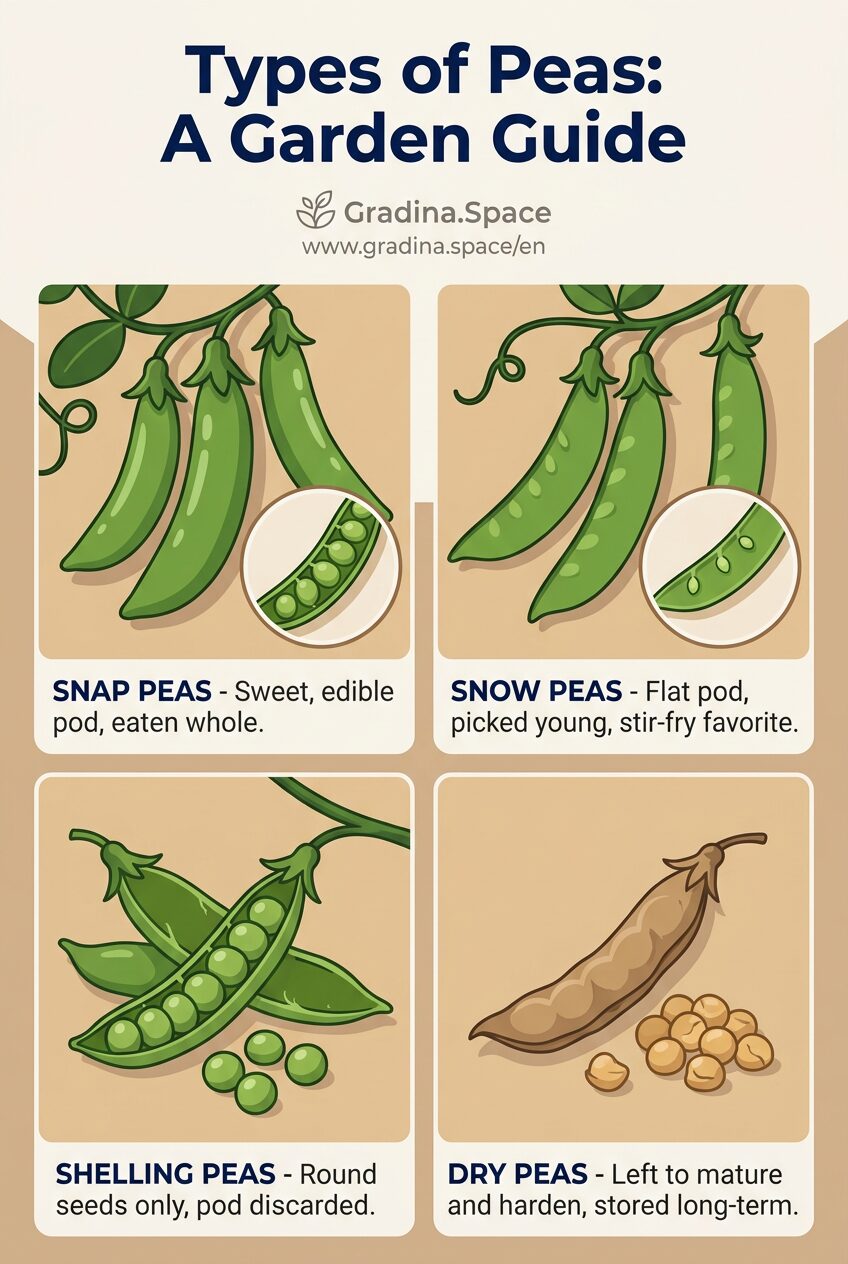
Peas are not all harvested the same way. Some are grown for sweet edible pods, some for tender green seeds, and some for dry storage. Choosing the right type before planting helps you match the crop to your cooking habits, garden space, and harvest schedule.
Snap peas
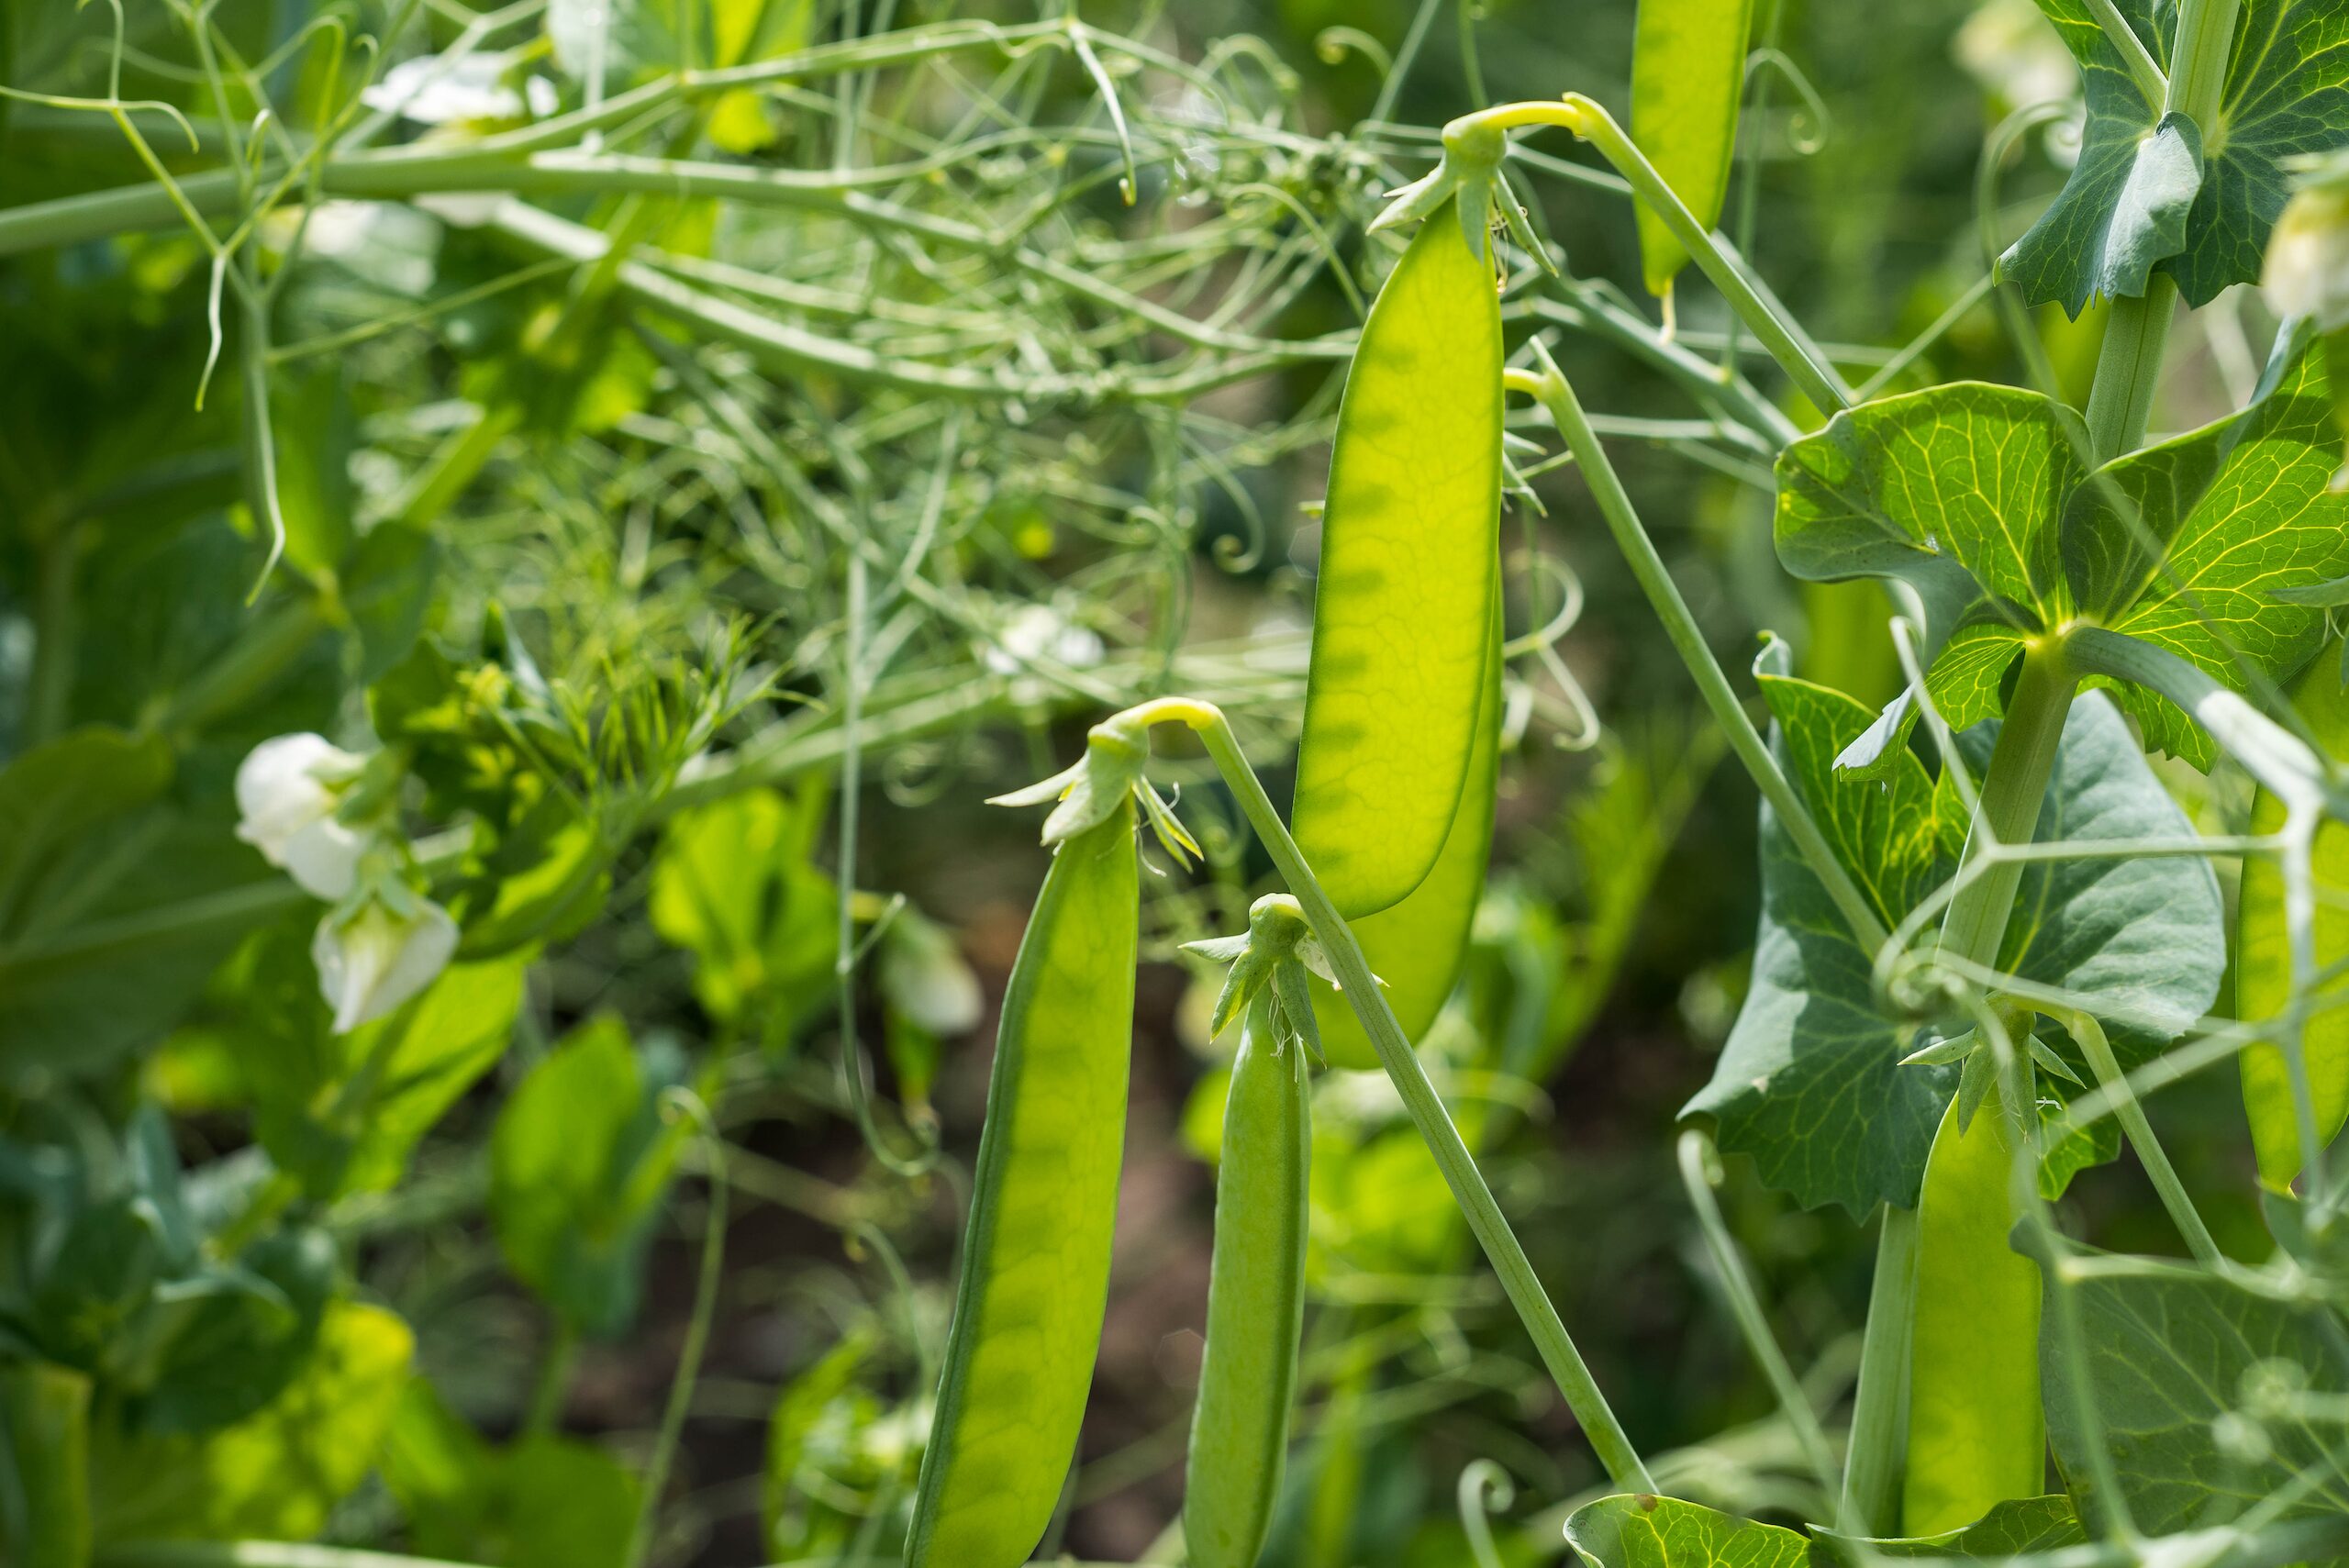
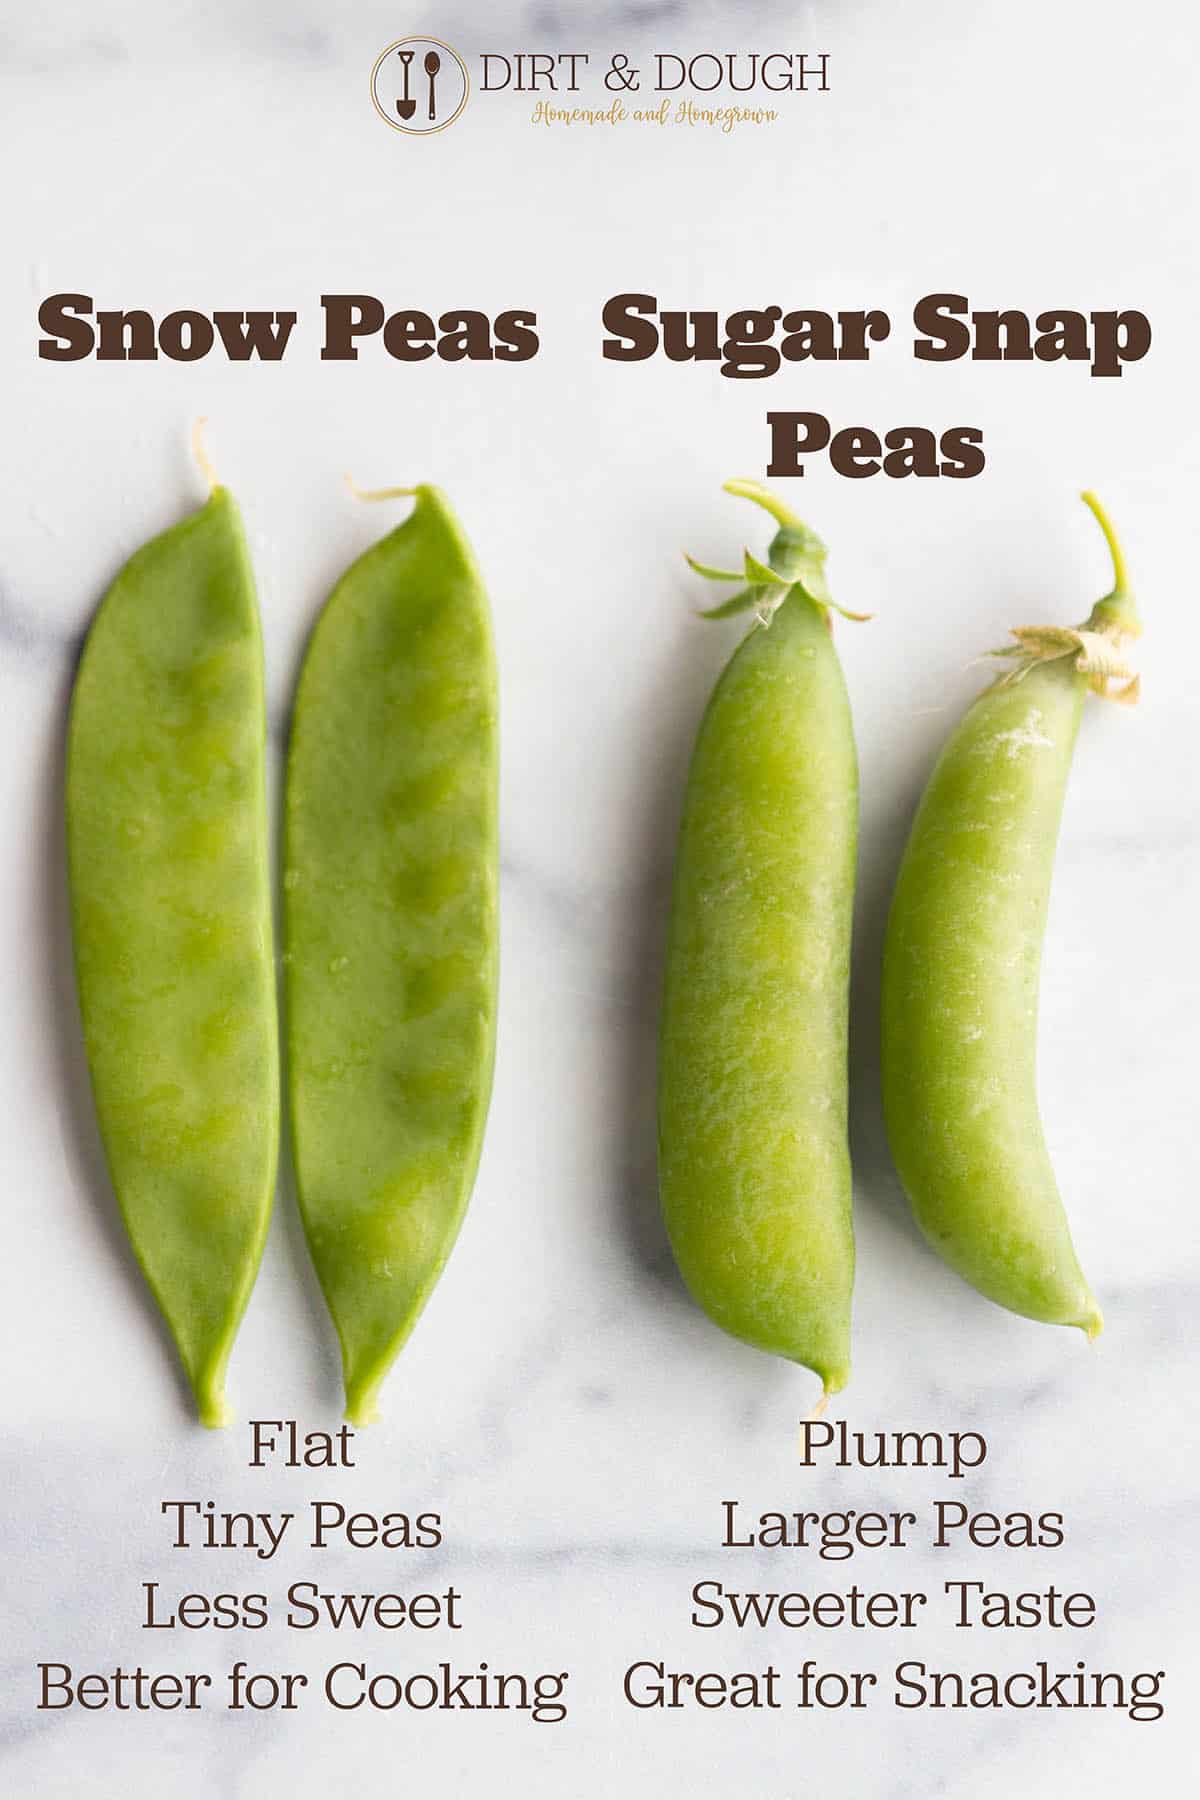
Snap peas have plump, edible pods and are often eaten raw, lightly sautéed, or added near the end of cooking. They are a good choice if you want a generous fresh snack from the garden. Harvest them when the pods are filled but still crisp and bright.
Many snap peas are vining types, though compact varieties are available. If you plant a tall snap pea, set up support early. Once vines tangle on the ground, lifting them onto a trellis can break stems.
Snow peas
Snow peas are harvested flat, before the seeds inside swell much. Their tender pods suit stir-fries, salads, and quick steaming. Because they are picked young, they can be very productive when harvested often.
The main timing cue is pod shape. Pick snow peas while pods are still thin and smooth. If the seeds become obvious bumps, the pods may turn tougher, though they are still usable in cooked dishes.
Shelling peas
Shelling peas, also called English peas or garden peas, are grown for the round seeds inside the pod. The pod itself is usually fibrous and not pleasant to eat. These peas are best harvested when pods are full but still green and glossy.
For peak sweetness, cook or chill shelling peas soon after picking. Their sugars begin changing after harvest, which is one reason homegrown peas can taste noticeably fresher than store-bought peas.
Dry peas
Dry peas are left on the plant until the pods turn brown and the seeds harden. They are useful for soups, stews, and long-term storage. If your climate has wet late-season weather, drying peas may be harder because mature pods can mold before they finish curing.
For dry peas, choose a variety described for drying or soup use. Let pods mature fully, then finish drying the seeds indoors if needed before
storage.
Bush peas and vining peas
Pea varieties are often described as bush, dwarf, semi-dwarf, or vining. Bush peas are shorter, commonly around knee height, and may crop heavily over a shorter window. Vining peas can grow several feet tall and usually need a stronger trellis, but they may provide a longer harvest if weather stays cool.
Choose bush peas if you garden in containers, raised beds, windy sites, or short-season areas where a concentrated harvest is useful. Choose vining peas if you have vertical space, enjoy repeated picking, and can install support before planting.
Key differences to consider:
- Space: Bush peas fit smaller beds and containers more easily.
- Support: Vining peas need a trellis; bush peas may still benefit from short twiggy support.
- Harvest pattern: Bush types often mature over a tighter period; vining types may continue producing with regular picking.
- Airflow: Taller vines must be trained so leaves dry quickly after rain or irrigation.
- Ease of picking: Supported vines keep pods visible, cleaner, and less likely to rot near damp soil.
Soil and site preparation
Peas grow best in a sunny location with fertile, well-drained soil. In hot climates, morning sun with light afternoon shade can extend the season. In cool spring weather, full sun helps plants grow strongly and dry out after rain.
Good drainage matters because pea seeds and roots are vulnerable to rot in saturated soil. If your garden soil is heavy clay, loosen the bed gently and add finished compost. Avoid turning the soil into a fluffy, overworked layer; peas need oxygen around the roots, but they also need stable soil contact for moisture.
A slightly acidic to neutral soil is generally suitable. If you use soil tests, follow local recommendations rather than guessing. Peas do not usually need heavy feeding, and too much nitrogen can push leafy growth at the expense of flowers and pods.
👉how to improve garden soil with compost
Compost and nutrients
Finished compost is usually the best starting amendment for garden peas. It improves soil structure, supports microbial activity, and releases nutrients gradually. Mix compost into the top few inches of soil before sowing, or apply it as a thin surface layer after seedlings emerge.
Peas are legumes, which means they can form a relationship with soil bacteria that convert atmospheric nitrogen into forms the plant can use. This process happens in root nodules, but it is not automatic in every bed. The right bacteria must be present, and the plant still needs other nutrients, including phosphorus, potassium, calcium, sulfur, and trace minerals.
If peas are new to your garden, a pea and bean inoculant may help, especially in beds that have not grown legumes before. It is not a substitute for good soil, but it can support nodulation. Follow the product label, because inoculants contain living organisms and are sensitive to heat, age, and storage conditions.
Soil temperature and germination
Pea Seed Germination: Soil Temperature Guide
High risk of seed rot in wet, cold soil.
Maximum germination success rate. Seeds wake up quickly with lower rot risk.
Poor germination, high soil heat stress.
Germination is the point when the seed absorbs water, activates enzymes, and begins sending out a root. In peas, this process is slowed by cold soil and disrupted by overly wet conditions. The seed needs moisture to wake up, but it also needs oxygen; saturated soil can reduce oxygen and encourage decay.
This is why early planting is a balance. Plant too late, and heat may shorten the harvest. Plant too early in wet soil, and seeds may rot before sprouting. If you want to test conditions, sow a small first row, then sow the rest a week later.
How to plant pea seeds step by step
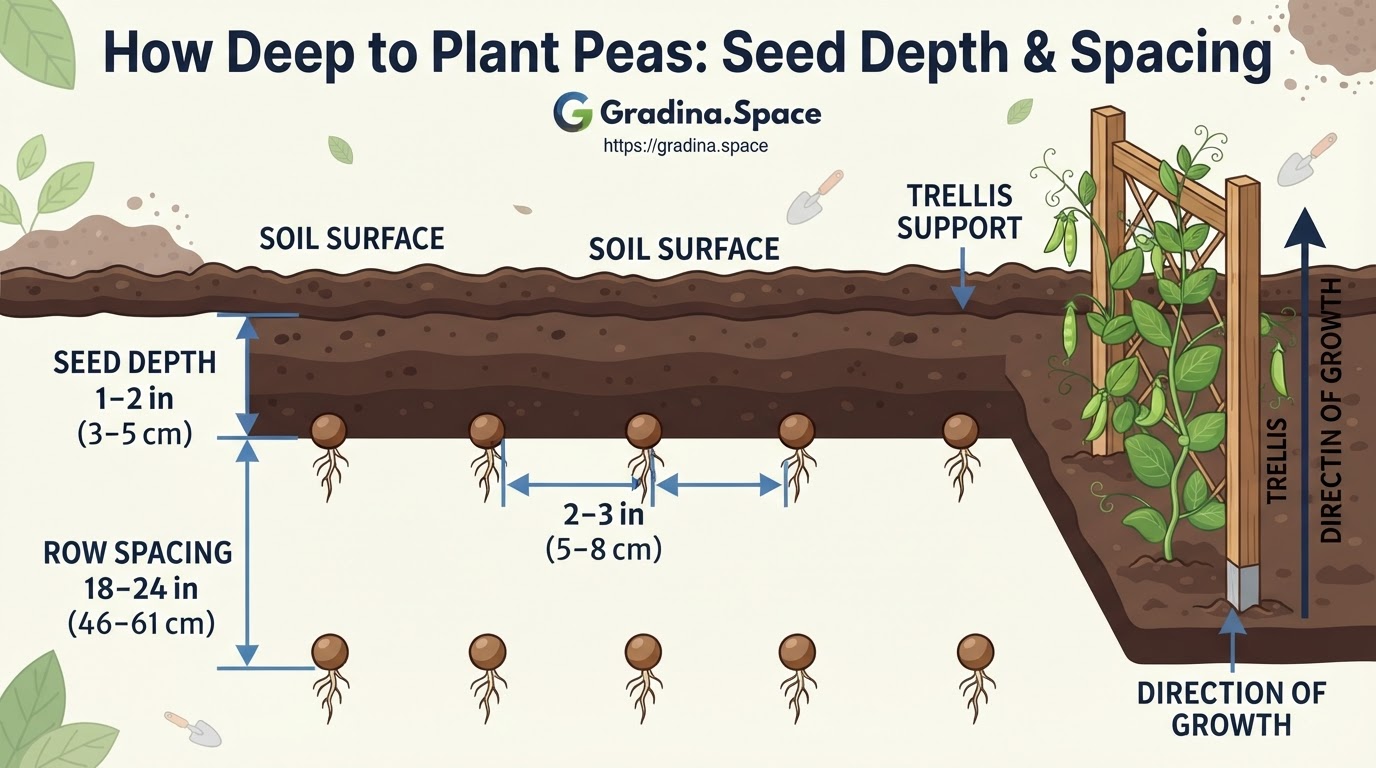
Direct sowing is the simplest and most reliable way to plant peas. Pea roots do not like major disturbance, so indoor starting is usually reserved for gardeners with very short seasons or special protection setups. If you do start indoors, use deep cells or biodegradable pots and transplant before roots become crowded.
Follow these steps for a strong start:
- Prepare the bed. Remove weeds, loosen the top layer of soil, and add finished compost if needed. Rake the surface level so seeds can be planted at an even depth.
- Install support first. For vining peas, set the trellis before sowing. This prevents root damage later and gives seedlings something to climb as soon as tendrils form.
- Soak seeds if conditions are favorable. Soaking pea seeds for several hours or overnight can speed water uptake. Do not soak longer than needed, and avoid soaking if the soil is cold and wet, because swollen seeds may rot more easily.
- Sow at the right depth. Plant seeds about 1 inch deep in heavier soil and slightly deeper in light, sandy soil. Local recommendations vary, so adjust for your soil texture and moisture.
- Space seeds closely but not crowded. Many gardeners sow peas about 2 inches apart in rows. Leave enough room between rows for airflow, harvesting, and trellis access.
- Water gently. Moisten the bed without washing seeds out of place. Keep the soil evenly damp until seedlings emerge.
- Protect the row if needed. Use row cover, netting, or simple barriers if birds, rodents, or slugs commonly disturb seedlings.
Once seedlings are a few inches tall, check for gaps. You can resow bare spots if the season is still cool enough. If every seed sprouts and the row is too crowded, thin lightly to improve airflow.
Trellising and support
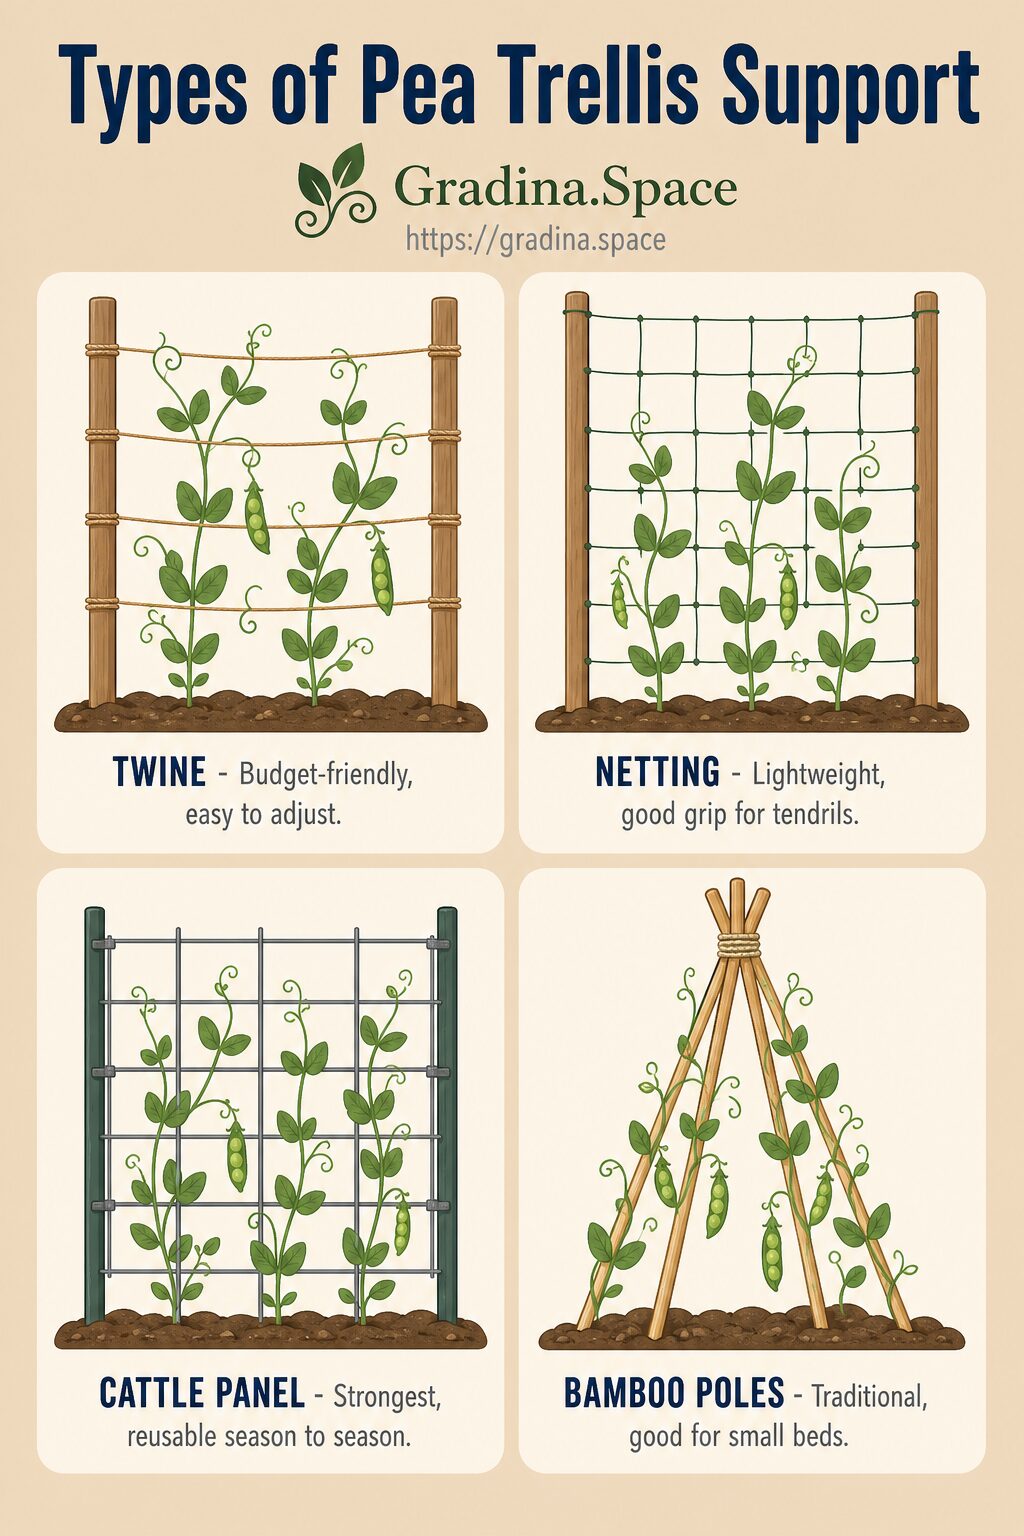
Peas climb with tendrils, which curl around narrow supports. A good trellis gives those tendrils many small contact points. Smooth, wide boards are less useful than netting, twine, twiggy branches, wire panels, or mesh.
Set support where it will not shade smaller crops too heavily. A north-side trellis is often useful in a vegetable bed because it lets peas climb without casting shade over sun-loving seedlings. In hot climates, a pea trellis can also provide light seasonal shade for lettuce or other cool-weather greens.
Simple trellis options
You do not need an elaborate structure, but the support must match the pea variety. Tall vines need height and sturdiness. Short bush peas may only need a low frame or twiggy branches to keep pods off the ground.
Practical options include:
- Twine between stakes: Affordable and easy to adjust. Add horizontal lines every few inches so tendrils can grip.
- Garden netting: Light and effective for peas, but remove vines carefully at the end of the season.
- Cattle panel or wire panel: Strong, reusable, and useful for tall vining peas.
- Bamboo poles with string: Good for small beds if tied securely.
- Pruned branches: A traditional option for bush peas, especially if you have twiggy garden cuttings.
Avoid waiting until vines are long. Pea stems are tender, and bending them into place later can reduce growth or break flowering tips.
Watering, mulching, and feeding
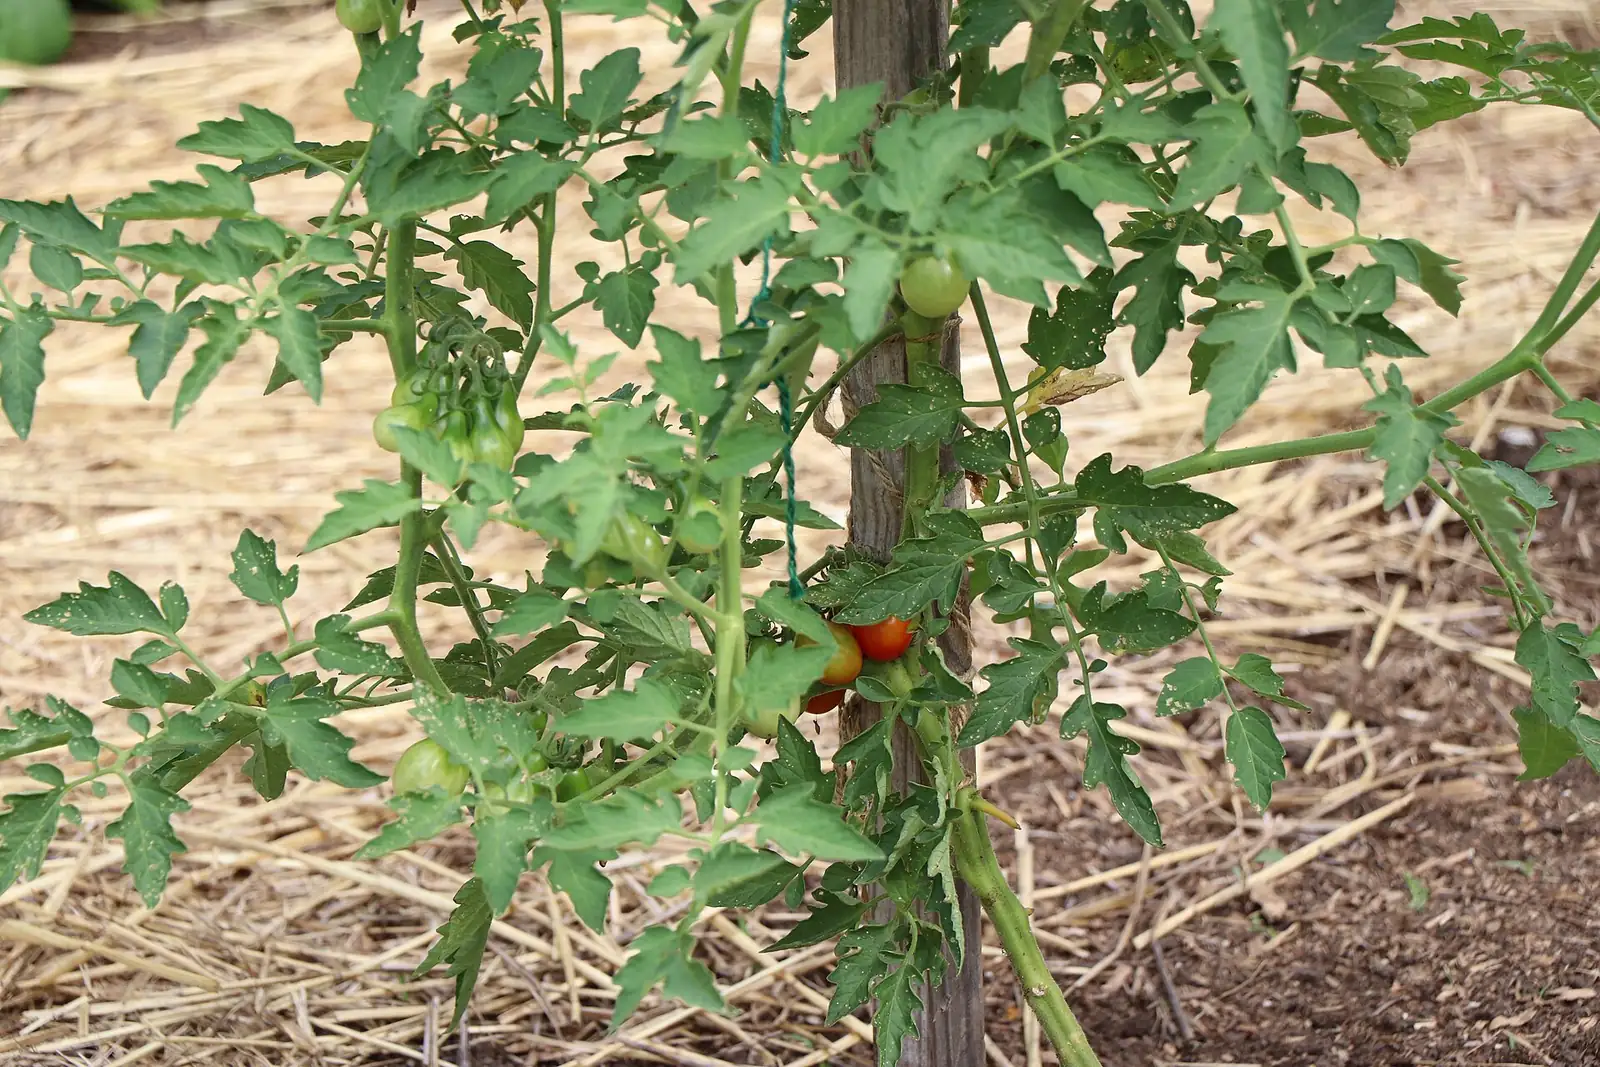
Peas need steady moisture, especially during flowering and pod formation. Inconsistent watering can lead to stressed plants and fewer pods(a problem common across many garden crops, as seen when tomato plants flower but fail to set fruit). At the same time, soggy soil encourages root problems, so water deeply when needed rather than keeping the surface constantly wet.
Mulch can help once seedlings are established. A light layer of straw, shredded leaves, or fine compost moderates soil temperature, reduces splashing, and slows weed growth. Keep mulch slightly away from the base of young stems so the crown area does not stay damp.
Feeding should be modest. If the bed has compost and a balanced nutrient supply, peas often need little extra fertilizer. Avoid high-nitrogen products unless a soil test shows a true deficiency, because excess nitrogen can produce lush vines with disappointing pod formation.
Flowering and pod formation
Pea flowers form when plants reach the right stage of growth under suitable temperature and light conditions. After pollination, pods develop from the flowers, and the seeds inside begin to swell. Heat, drought, nutrient imbalance, or root stress during this period can reduce pod set.
Peas are mostly self-pollinating, so they do not depend heavily on insect pollinators in the way squash or cucumbers do. Still, a healthy garden ecosystem helps overall plant resilience. Avoid spraying anything during bloom unless it is truly necessary and appropriate for edible crops.
Weed control and companion planting
Weeds compete with peas for water, nutrients, and light. The best time to control weeds is before the pea vines fill in. Shallow cultivation is safest because pea roots grow near the soil surface and can be damaged by deep hoeing.
Hand-pull small weeds after watering or rain, when the soil releases roots more easily. Once peas are established, mulch will reduce new weed germination and make the bed easier to manage.
Companion planting should be treated as a practical spacing strategy rather than a guarantee. Peas can share space with cool-season greens, radishes, carrots, and herbs if each crop has enough light and airflow. Avoid placing peas where large, fast-growing plants will shade them too soon.
👉 2025 companion planting guide for vegetables
Pest and disease prevention
Healthy peas begin with prevention. Good timing, crop rotation, clean trellises, and airflow reduce many problems before they become serious. Because peas grow quickly in cool weather, small stresses can matter; check plants often rather than waiting until damage is widespread.
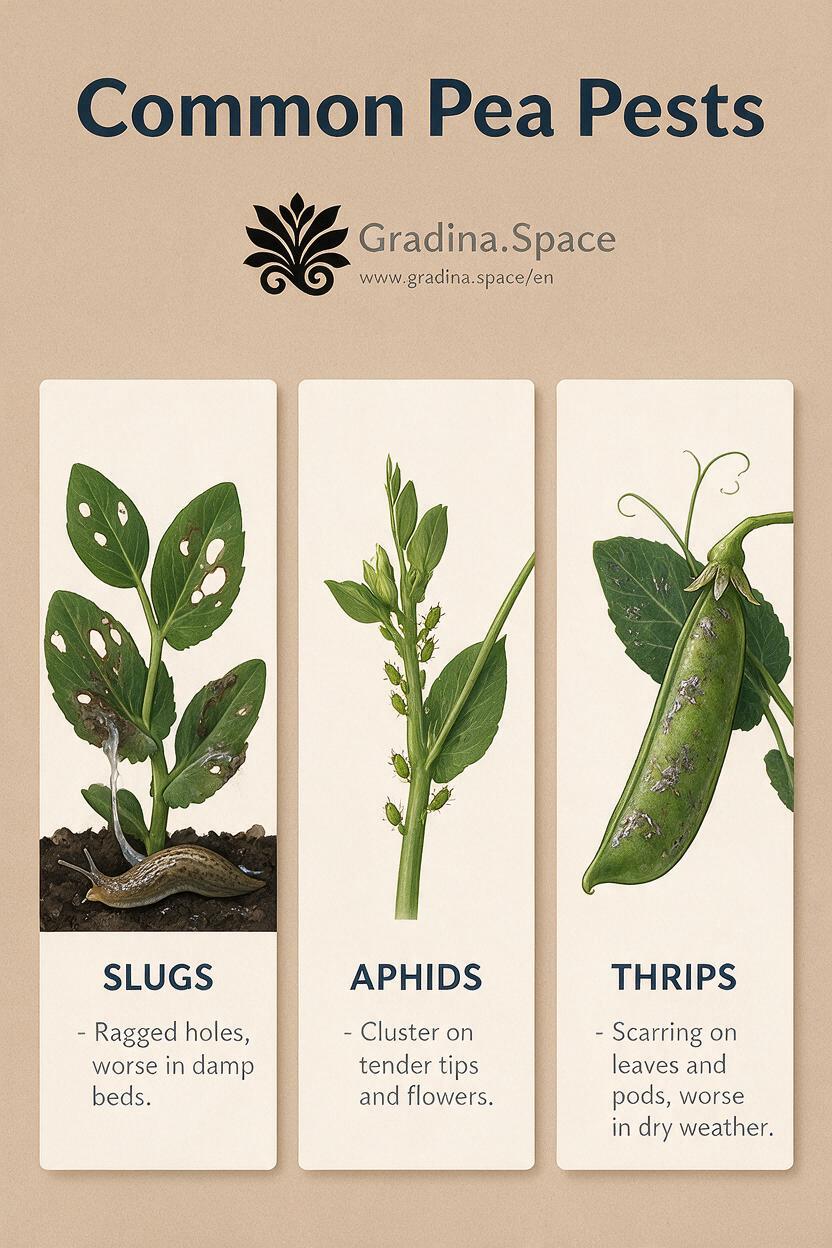
Common pests include slugs, aphids, thrips, pea moths in some regions, and birds that pull emerging seedlings. Slugs are most troublesome in damp beds with hiding places. Aphids often gather on tender tips and flower stems. Thrips can scar leaves and pods, especially in dry conditions.
Use the least disruptive control that works:
- Remove weeds and debris where pests shelter.
- Water the soil, not the foliage, when possible.
- Use row cover early, before pests arrive, and remove it if it interferes with growth or harvest.
- Handpick slugs in small gardens or use appropriate traps and barriers.
- Rinse aphids from plants with water, or prune heavily infested tips if damage is limited.
- Rotate peas and beans to a different bed each season when space allows.
Diseases often show up as yellowing plants, wilting, white powdery patches, spots, or rotting roots. Powdery mildew is more likely when plants are crowded or stressed, though it can also appear late in the season as vines age. Root rot is associated with poor drainage, compacted soil, and overly wet conditions.
If disease appears year after year, change the planting location, improve drainage, and choose resistant varieties when available. Do not compost badly diseased plant material unless you manage a hot composting system carefully.
How do you harvest peas at the right time?
Harvest peas according to the type you planted: snow peas when pods are flat, snap peas when pods are plump and crisp, shelling peas when seeds fill the pod, and dry peas when pods are brown and seeds are hard. Pick often, because mature pods signal the plant to slow production. Use two hands when harvesting so you do not tear the vine from the trellis.
Frequent picking is especially important for snap and snow peas. A pod that is perfect today may be too mature in a day or two during warm weather. Morning harvests are pleasant because pods are cool and firm, but the main rule is to pick before quality declines.
Harvesting fresh peas
For snow peas, look for full-size pods that remain mostly flat. For snap peas, wait until the pod rounds out but before it turns dull or stringy. For shelling peas, press the pod gently; it should feel filled but not hard.
Hold the vine with one hand and pinch or snip the pod with the other. Pulling with one hand can break stems, loosen roots, or detach flowering sections that would have produced more pods.
Harvesting dry peas and seeds
For dry peas, leave pods on the plant until they turn brown and papery. If wet weather threatens, pull mature plants and hang them in a dry, airy place to finish curing. Shell the peas when the pods are brittle and the seeds are fully hard.
Before storage, make sure seeds are dry all the way through. Any remaining moisture can lead to mold in a sealed container. If in doubt, dry them longer in a warm, ventilated area out of direct harsh sun.
Storage and kitchen use
Fresh peas are best used soon after harvest. If you cannot cook them right away, refrigerate them unwashed in a breathable bag or container for a short period. Wash just before use to reduce excess moisture during storage.
For longer storage, blanching and freezing is the most useful method for snap, snow, and shelling peas. Blanching slows enzyme activity that affects flavor, color, and texture. Use current food preservation guidance for exact blanching times, because timing varies by pea type and pod size.
Dried peas should be stored in airtight containers in a cool, dry, dark place. Label the container with the variety and year. For cooking, dried peas may need soaking or longer simmering depending on type, age, and how dry they became in storage.
Pea types match different kitchen uses:
- Snow peas: Stir-fries, salads, noodle dishes, and quick sautés.
- Snap peas: Fresh snacks, lunch boxes, roasting, steaming, and salads.
- Shelling peas: Soups, risotto, pasta, purees, and simple side dishes.
- Dry peas: Split pea soup, stews, dal-style dishes, and pantry meals.
👉 recipes for fresh garden peas
Troubleshooting growing peas
Even careful gardeners sometimes get weak germination, yellow vines, or poor pod set. Peas respond strongly to weather and soil conditions, so the cause is often environmental rather than mysterious. Work through the symptoms in order: seed condition, soil moisture, temperature, drainage, nutrients, pests, and disease.
Seeds do not sprout
Poor germination is often caused by cold, wet soil; old seed; deep planting; or pests eating the seed. Pea seeds are large and absorb water readily, but if they swell in soil without enough warmth and oxygen, they may rot. Dig gently in one failed spot to see whether seeds are missing, mushy, or still firm.
If seeds rotted, wait for better soil conditions and resow. If seeds disappeared, protect the next sowing with row cover or netting. If seeds remain firm and unsprouted, the soil may be too cold or the seed may no longer be viable.
Seedlings are yellow or weak
Yellow seedlings may be dealing with saturated soil, compacted roots, nutrient imbalance, or cold stress. Peas naturally grow slowly in very cool weather, but they should still look sturdy. If the entire row is pale and stunted, check drainage first.
Do not rush to add high-nitrogen fertilizer. If roots are struggling in wet soil, fertilizer will not solve the main problem. Improve drainage, avoid overwatering, and use compost to support gradual nutrient availability.
Plants grow leaves but few pods
Lush vines with few flowers or pods may have too much nitrogen, not enough sun, or heat stress. Peas need enough light to build energy for flowering. They also need cool conditions during bloom.
If the weather has turned hot, there may be little to do except harvest what forms and plant earlier next season. If shade is the issue, choose a brighter bed next time. If fertilizer is the likely cause, reduce nitrogen inputs and rely more on compost.
Flowers drop without forming pods
Flower drop can occur during heat, drought, or sudden stress. Keep soil evenly moist during flowering, and mulch to moderate temperature swings. In containers, check moisture daily during warm spells because pots dry faster than garden beds.
Some early flower drop may happen if plants are still establishing. If new growth looks healthy and weather improves, later flowers may set pods normally.
Leaves develop white powder
White powdery growth on leaves is often powdery mildew. It commonly appears when air circulation is poor or plants are stressed, and it often worsens late in the crop’s life. Remove the worst affected leaves if practical, water at soil level, and avoid crowding future plantings.
If mildew arrives near the end of harvest, it may simply mark the natural decline of the planting. If it appears early every year, look for resistant varieties and rotate crops.
Pods are tough or starchy
Pods become tough when they are left too long on the vine or mature during hot weather. Snow peas should be picked flat, snap peas while crisp, and shelling peas before the seeds become hard. Harvest more often during warm spells.
Tough pods are still useful in cooked dishes if they are not fibrous beyond use. For shelling peas, older peas can go into soups rather than delicate fresh dishes.
Seed saving for future crops
Peas are one of the easier vegetables for seed saving because they are mostly self-pollinating. That means a variety often remains true to type with less isolation than many cross-pollinated crops. Still, if you are saving seed from more than one pea variety, leave distance between varieties or separate them with other crops to reduce accidental crossing.
Choose healthy plants that showed the traits you want: strong growth, good pod production, disease tolerance, and flavor. Do not save seed from weak or diseased plants simply because they still have pods. Seed saving is selection, and selection shapes next year’s crop.
Let pods dry on the vine until brown, then shell and dry seeds further indoors. Store them in a labeled envelope or jar once fully dry. Keep saved seed cool, dark, and dry, and test germination before relying on older seed for a full planting.
👉HOW LONG DOES GERMINATION TAKE!
FAQ about growing peas
This section answers common practical questions without repeating the full growing process. Use these answers as quick checks when planning your planting or diagnosing a problem.
Can you grow peas in containers? Yes, especially bush peas and compact snap peas. Use a container deep enough for steady root growth, add drainage holes, and place a short trellis or twiggy support at planting time. Containers dry faster than garden beds, so monitor moisture closely during flowering and pod formation.
Should pea seeds be soaked before planting? Soaking can speed germination by softening the seed coat, but it is optional. It works best when soil conditions are already suitable. In cold, wet soil, soaked seeds may be more vulnerable to rotting, so dry sowing can be safer.
Do peas need fertilizer? Peas usually need compost and balanced soil more than strong fertilizer. Because they can fix nitrogen with the help of compatible bacteria, heavy nitrogen feeding is often unnecessary. If growth is poor, use a soil test or examine drainage before adding nutrients.
Do peas need full sun? Peas generally perform best with good sun in cool weather. In warm regions or late plantings, light afternoon shade can help reduce heat stress. Too much shade, however, can reduce flowering and pod production.
Can you start peas indoors? You can, but direct sowing is usually easier. Pea roots are sensitive to disturbance, so transplants should be young and grown in deep cells or pots that protect the root ball. Indoor starting may help where spring is very short or outdoor pests destroy seedlings.
How long do peas take to grow? The timeline depends on variety, weather, and planting season. Seed packets give the best estimate for a specific variety, but cool soil can slow early growth and hot weather can shorten the harvest period. Always plan with your local conditions in mind.
Can peas grow after a frost? Established pea plants tolerate light cold better than heat, but hard freezes can damage flowers, pods, and tender growth. Young seedlings are usually tougher than open blossoms. Protection such as row cover can help during brief cold snaps.
Practical next steps
Choose one pea type that fits how you actually cook: snap peas for fresh eating, snow peas for tender pods, shelling peas for classic garden peas, or dry peas for storage. Then check your next cool planting window, prepare a well-drained bed with compost, and install support before sowing. Plant a short row first if your soil is still cold or wet, then continue sowing as conditions improve.
For the best first crop, keep the plan simple: direct sow, water steadily, mulch after seedlings are established, and harvest early and often. Make notes on planting date, variety, weather, and harvest quality. Those small records will tell you more about growing peas in your own garden than any general rule can.
Sources:
University of Maryland Extension – Growing Peas in a Home Garden